Understanding Your Honeywell Thermostat Model
Identify Your Honeywell Thermostat Unit
Before jumping into replacing the batteries in your Honeywell thermostat, it is essential to recognize the specific model you are dealing with. Honeywell produces a wide variety of thermostat models, each with its own features and battery specifications. Identifying the correct model not only ensures you purchase the appropriate battery type but also provides insight into accessing the battery compartment effectively.
Begin by examining the display of your thermostat. Often, the model number is available on the screen during a startup or sometimes located inside the compartment. If not visible, consider consulting the user manual or checking the back of the unit for a model sticker.
Determine Battery Requirements
Once the specific Honeywell thermostat model is identified, understanding the types of batteries needed is the next step. Common batteries used include AA, AAA, or coin cell batteries, though this can vary. Identifying your battery requirements simplifies the battery replacement when swapping out dead or low batteries.
Make sure to verify how frequently the batteries need changing. Some units might require battery replacements annually, while others may last longer. To get a better grasp of this, checking resources such as this comprehensive guide on understanding your smart thermostat's battery can be quite informative.
Gathering the Necessary Tools and Batteries
Equipping Yourself with the Right Tools and Materials
Before delving into the process of replacing the thermostat batteries in your Honeywell unit, it's crucial to gather all the necessary elements to ensure a smooth transition. Making sure all tools and materials are in place will make the change efficient and stress-free.- Identify your model: Not all Honeywell thermostats are created alike. Knowing your Honeywell thermostat model will help determine the correct type of batteries needed and any specific removal requirements. This information can usually be found on the device itself or in the user manual.
- Batteries to use: Honeywell thermostats predominantly require AA or AAA batteries. However, checking your specific thermostat model will clarify which is needed, thus preventing unnecessary trips to the store.
- Tools for the task: While most battery compartments can be accessed without tools, some Honeywell models might require a small screwdriver to ease the process of accessing the compartment or removing the unit from the wall.
- Safety precautions: Make sure your HVAC system is turned off before starting the battery change. This precaution is critical to prevent any unintentional alterations to the heating or cooling system settings during the battery replacement process.
Accessing the Battery Compartment
Locating the Battery Access Point
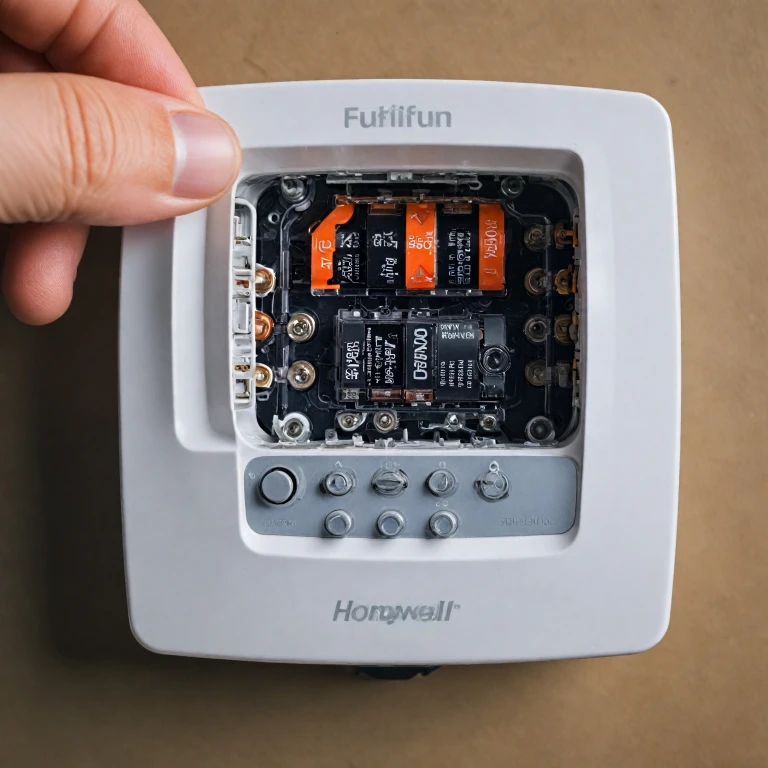
Finding and accessing the battery compartment of your Honeywell thermostat can be the trickiest part of the battery replacement process due to varied designs across different Honeywell thermostat models. Depending on the model you own, the method to access the battery compartment may differ, so ensuring an understanding of your specific thermostat is crucial. Firstly, identify whether your thermostat is a wall-mounted unit. Wall-mounted Honeywell thermostats commonly have a compartment or panel located directly on the device's display section or under its frontal cover. Begin by gently pulling or sliding the thermostat away from the wall-mount bracket, as this will often reveal the hiding battery compartment. In some models, you'll need to pull the display section from the base to uncover the compartment. It's advisable to consult the user manual specific to your Honeywell model if uncertainties arise during this step. This access could involve removing a cover held by screws or snapping off a cover with gentle pressure. Moreover, take note of the state of the battery compartment. For instance, is there any visible damage or corrosion? Although uncommon, if your model’s battery compartment shows such signs, it may indicate an issue potentially affecting the HVAC system's power efficiency. In such cases, contacting a professional for further inspection may be wise. This procedure to access the batteries is simplified in modern smart thermostats with front-facing compartments, making maintenance more user-friendly. Taking the time to familiarize yourself with the battery compartment's location and condition can help to streamline not just this battery replacement process but also future maintenance of your heating cooling system.Removing Old Batteries
Safely Removing the Existing Batteries
Once you've successfully accessed your Honeywell thermostat's battery compartment, the next step is to gently remove the old batteries. It’s essential to ensure your HVAC system is turned off or in a safe mode to avoid any power issues during the change.
Carefully look at how the current batteries are positioned within the compartment. This observation will help you when it's time to insert the fresh batteries. For most Honeywell thermostat models, you will notice small diagrams indicating the correct placement of battery ends.
Use your fingers or a suitable tool to pull out the batteries. Be cautious during this step to avoid damaging the battery contacts within the unit. Once the batteries are removed, inspect the compartment for any signs of acid leakage, corrosion, or dirt.
Proper disposal of the old batteries is crucial for both safety and environmental reasons. Look for local guidelines on battery disposal to ensure you are compliant.
Inserting New Batteries
Carefully Placing the Fresh Batteries
After the old batteries have been safely removed, it's time to introduce fresh ones to your Honeywell thermostat. Make sure to use the correct battery type as specified in your user manual, which often highlights the necessary power source for various Honeywell thermostat models. Typically, AA or AAA batteries are required, but confirming the specifics for your model is critical.The battery compartment, often nestled within a wall-mounted unit, usually contains pictorial guides showing the correct orientation of the batteries. This ensures that the positive and negative ends align with the marked slots. Incorrectly positioned batteries can prevent the thermostat from regaining power, causing interruptions to your cooling and heating system.
- Align the battery ends with the indicators within the compartment.
- Gently slide each battery into place, ensuring a snug fit to prevent shifting.
Once the new batteries are securely in, confirm they are seated properly. A slight jostle might indicate that a battery isn't fully engaged, which can lead to a "low battery" warning soon after replacement.
Remember, periodically checking and changing the batteries, particularly annually, can stave off unexpected power drains, keeping your HVAC system running efficiently throughout the year. A well-functioning thermostat regulates air conditioning and heating, ensuring comfort in your living space.
Testing and Finalizing the Replacement
Checking the Display and Ensuring Proper Operation
Once you've carefully placed fresh batteries into the Honeywell thermostat, it’s crucial to ensure that the thermostat is functioning correctly. Here’s how you can confirm that the replacement has been successful:- Inspect the Display: After closing the battery compartment and securing the thermostat back onto the wall, observe the display. A clear, bright readout indicates that the power from the new batteries is reaching the unit effectively.
- System Check: Turn on your HVAC system by adjusting the heating or cooling settings. Make sure the unit responds without delay. If you hear the system kick on or off as expected, it’s a good sign that the thermostat connection is solid.
- Temperature Test: Use the thermostat to set temperatures for both heating and cooling modes. Observe if the air from the vents aligns with your settings. This confirms the functionality of the HVAC system in sync with the thermostat's commands.
- Regular Operation Monitoring: Over the next few days, keep an eye on the thermostat display and your overall heating and air conditioning system’s responsiveness. This ensures that there are no issues with the recent battery change.