Understanding the Honeywell T6 Pro Thermostat
Getting to Know the Honeywell T6 Pro Thermostat
The Honeywell T6 Pro thermostat is a modern device designed to optimize your home's heating and cooling systems efficiently. This thermostat supports various systems, including heat pumps and forced air, offering users adaptability and control. With a sleek interface and a host of features, understanding how to use it effectively is crucial for enjoying its benefits. The thermostat screen will be your primary interface. It allows you to view current settings and temperatures, including specifics for modes such as heat pump operation or auxiliary (aux) heating. Boosting comfort, it accommodates stages like compressor performance and fan relay activation, helping optimize the heating or cooling cycles. You might become familiar with some acronyms and terms on the screen, like ISU (Installation Setup Utility), CPH (Cycles Per Hour), and VAC common. These components are integral to the thermostat’s efficiency in controlling the climate settings precisely. Additionally, tabs like the common wire tab and slider tab allow for easy customizations to match your specific heating and cooling equipment. Each button and tab serves its purpose, affecting how the thermostat operates. For example, using the set heat function helps adjust the house's warmth to your preferred level. The mode tabs on the thermostat screen let you switch quickly between energy-saving modes, including emergency heat and various stages of heating or cooling. As you delve deeper into understanding this thermostat, you’ll find it vital to comprehend technical aspects, such as the terminal label connections and cycle rate, which dictate the overall system efficiency. These elements contribute to the thermostat's core functionality by enabling power joined operations between cooling and heating elements like the tab compressor and compressor contactor. To delve deeper into the intricacies of thermostat functionalities and their setup, explore our guide on understanding the T705 manual for smart thermostats.Preparing for Installation
Preparation and Gathering of Required Materials
Installing the Honeywell T6 Pro Thermostat requires a bit of preparation to ensure a smooth process. Before you start, it's essential to gather all necessary materials and tools. You'll need the Honeywell Pro thermostat, a screwdriver, and the appropriate wires for your heating and cooling system. Make sure to double-check the compatibility of your existing system with the Honeywell T6 Pro, especially if you have unique setups such as a two-stage heat pump or forced air distribution.Understanding Your Current Heating and Cooling System
Getting to know your current system setup can save you time and potential errors. Identify the type of heating system you have—whether it’s a heat pump, forced air, or another type. It's crucial to understand the different terminals and wires involved, such as the tab compressor, fan relay, and emergency heat aux wire. Each of these components plays a vital role in maintaining the desired temperature and efficiency in your household.For instance, systems with a heat pump typically require specific connection points, like the compressor contactor and stages of heating or cooling, that you need to connect accurately to your thermostat.
Identifying and Labeling Your Wires
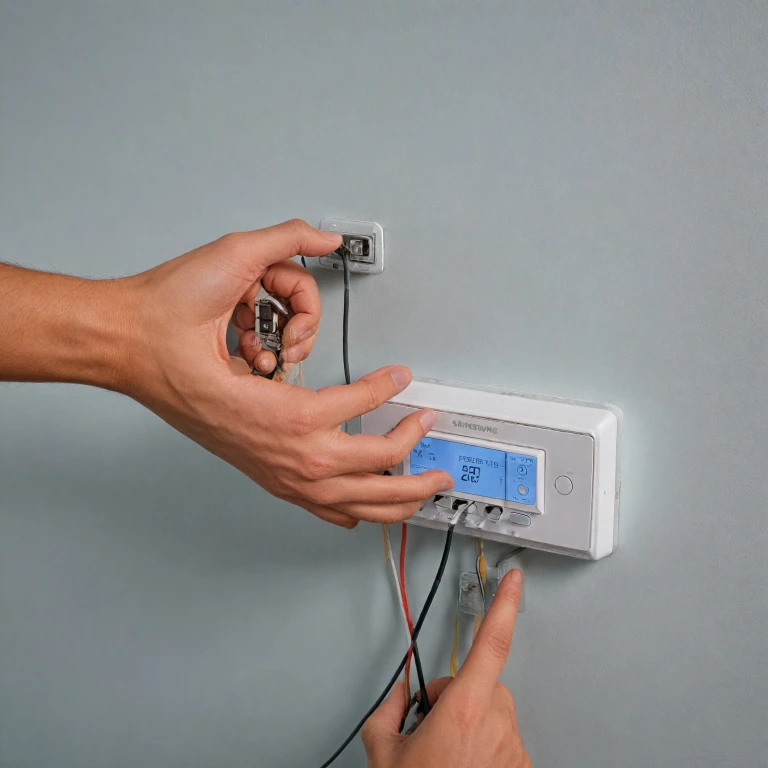
Before the thermostat installation, turn off the power to your heating and cooling system to ensure safety. It is crucial to identify and label each wire connected to your existing thermostat. Common wires you might encounter include the ‘R,’ ‘C’ (common), ‘Y’ (compressor), ‘G’ (fan relay), and others. Pay attention to the ISU displayed and power joined slider tabs, as they may influence the function and performance of your new thermostat.If your system lacks a ‘C’ wire, take into account the compatibility and additional steps required to add or adapt wiring compatibility of your system with smart thermostats. This will ensure your thermostat screen functions correctly and consistently. Preparedness will significantly enhance your installation experience, allowing you to move seamlessly into the step-by-step installation process.
Step-by-Step Installation Process
Initiating the Step-by-Step Guide for Installing the Thermostat
Now that you've prepared for installation, it's time to dive into the hands-on process of installing your Honeywell T6 Pro thermostat. Here is a clear, easy-to-follow guide to assist you in this endeavor.Installation and Wiring Setup
- Power Off Your System: Ensure safety first by switching off your HVAC system at the breaker. This prevents any risk of electrical shocks during installation.
- Remove the Old Thermostat: Gently detach the existing thermostat. If you're unfamiliar with your current wiring or terminals, take a photo to serve as a reference.
- Mounting the Backplate: Locate the appropriate area on the wall and position the backplate. Use a level and pencil to mark drill points. Secure the backplate using screws for a snug fit.
- Identifying and Connecting Wires:
- Utilize the thermostat screen to see which connector your wires go into.
- Pay attention to wires labeled as common (C wire) and verify their position on the terminal.
- Look out for wires like aux, and verify they connect to the right slot; these will be important for heat pump installations.
- Terminal Hookup Guidance:
- Connect the wires to the matching lettered terminals. This includes connections for the fan relay, heat pump, compressor contactor, air cph, and other relevant controls.
- Ensure common wire connections are secured as this often facilitates the thermostat’s power.
- Finalizing the Thermostat Attachment:
- Once the wires are appropriately connected, carefully mount the thermostat onto the backplate.
- Check that the unit is firmly attached and appears level for a neat installation.
Verification and Testing
- Power Up the System: After ensuring a correct fit and wiring, switch the HVAC system's power back on.
- Configure the Initial Settings: Follow prompts displayed on the thermostat screen to set heat/AC preferences. This often involves setting your preferred temperature and testing both heat and air modes.
Configuring Your Thermostat Settings
Adjusting Temperature and System Settings
Once your thermostat is installed and powered on, you’ll want to customize it to match your heating and cooling preferences. Begin with the thermostat screen, where you can adjust the temperature settings. You'll notice that the screen offers options for different modes, such as cooling and heating mode. Using the set heat option, you can establish your preferred set temperature for each mode.
Configuring Advanced Options
Beyond basic temperature controls, the Honeywell T6 Pro allows you to configure more advanced settings. Access the ISU (Installation Setting Unit) menu where displayed ISU options will guide you through adjustments like cycle rate (known as CPH) and wire arrangement. Here, you'll determine if you have a heat pump system or a forced air system, and set the appropriate settings accordingly.
Customizing Fan Operations
Fan control is another critical element controlled via the thermostat. Your Honeywell Pro model lets you dictate how your fan operates within the system. You can manage the fan relay settings directly from the fan operations menu, determining if the fan should run continuously or intermittently depending on your needs. This is especially useful if your system has both a heat pump and an auxiliary or emergency heat option.
Utilizing Equipment Specific Options
If your HVAC system includes components like vac common wires, compressor contactors, or terminal screws, the thermostat provides options to fine-tune these elements for optimal performance. Utilize the power joined settings for better control, and ensure any joined slider tab connections are secure for stages like the compressor stage.
Each setting impacts how your HVAC system blends hot and cold, ensuring comfort across all seasons. For further detail on optimizing thermostat controls for efficient smart home integration, exploring detailed manuals may offer in-depth guidance. Consider how wires are routed through the backplate or cover plate, impacting both the visual setup and functionality.
Connecting to Wi-Fi and Smart Home Systems
Establishing the Connection with Wi-Fi and Smart Home Systems
Connecting your Honeywell T6 Pro thermostat to Wi-Fi and integrating it with smart home systems is a game-changer for managing your home's temperature with utmost convenience and efficiency. This section guides you through the steps needed to seamlessly integrate your thermostat.Wi-Fi Connection Setup
- Ensure your thermostat is powered up with the display active. A stable power supply is crucial for a successful setup.
- On the thermostat screen, navigate to the 'Menu' using the joined slider to access 'Wi-Fi Setup'.
- Select your home Wi-Fi network from the displayed list. Input your network password carefully, as a correct password is vital for connection.
- Once connected, the thermostat screen should display an icon confirming the successful connection.
Integration with Smart Home Systems
Integrating your thermostat with smart home systems can enhance control and flexibility. Here's how to proceed:- If you're using platforms like Alexa or Google Home, begin by opening the respective app on your smartphone or tablet.
- Within the app, add a new device or skill and select Honeywell Pro from the list of available options.
- Follow the app's prompts to finish the setup, linking your accounts and granting necessary permissions.
- You can now use voice commands to adjust the thermostat settings, monitor the temperature, and manage the heating or cooling mode.
Troubleshooting Common Connection Issues
- If you encounter an issue where the thermostat screen is not displaying connected status, ensure that you have entered the correct Wi-Fi credentials and that your network is operational.
- Verify that your smart home system recognizes the thermostat by ensuring the skill or device is properly linked in the app.
- Checking the ISU displayed settings might also be necessary to verify that the model is compatible with your smart system.
- Consider restarting your router or devices if persistent connection issues remain.
Troubleshooting Common Installation Issues
Dealing with Common Installation Issues
When installing the Honeywell T6 Pro Thermostat, a smooth setup isn't always a guarantee. Here are some common issues you might encounter and suggestions on how to resolve them:- Wires Not Connecting Properly:
- Ensure all wires are securely connected to their respective terminals. The wire may sometimes need some extra attention to ensure it's firmly seated within the terminal slots.
- Pay special attention to the common wire, frequently referred to as the C-wire, as it powers the thermostat continuously.
- Thermostat Not Powering On:
- This could be due to the power joined or the vac common not being correctly attached. Double-check that the C-wire is connected securely, as this wire is crucial for delivering power.
- Verify that the circuit breaker for your HVAC system is turned on.
- Inconsistent Heating or Cooling:
- Check the cycle rate (cph) settings. This thermostat has adjustable settings to accommodate different types of systems, such as heat pump or forced air. Adjusting the cycle rate can improve consistency.
- Ensure that the correct set heat and emergency heat modes are activated, particularly in systems with aux or backup options.
- Screen Display Issues:
- If the thermostat screen isn't responding or is erratic, try resetting the unit by briefly removing it from its cover plate and then reattaching.
- Check if the isu displayed options are set correctly. Sometimes a factory reset can help clear up any screen issues.
- Wrong Temperature Readings:
- Test and calibrate the temperature settings using the slider tab within the settings to ensure accurate readings.
- Ensure the thermostat isn't placed in direct sunlight or near sources of artificial heat and check the fan relay if the incorrect temperature is displayed.
- Equipment Compatibility Issues:
- If you’re experiencing issues like malfunctioning stages or erratic operation of specific components such as the pump or compressor contactor, consult with your HVAC system's manual to ensure compatibility.